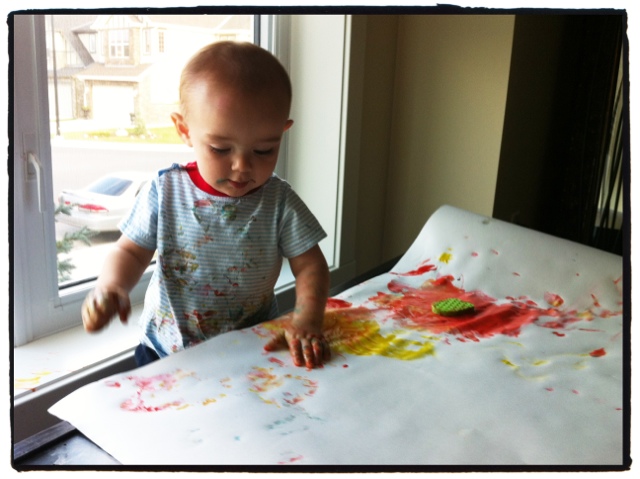
Now that the holidays are over (sigh) it's time to get back to doing some fun art projects (yay!). Here's an easy prep activity that will keep your little person entertained in gooey, sticky heaven for at least 30 minutes or more.
Jello Paint
Ingredients:
Jello powder - several flavours (as many as you want colours)
Warm water
1. For each colour put 1/4 cup of warm water into a small bowl.
2. Add jello powder, 1 tsp at a time and stir. Keep adding until you have a consistency that is good to paint with.
3. Put out the paints and some paper (we used newsprint but I'd recommend something sturdier as the paint seeped through and made holes in the paper. Let your little Picasso explore the paint with their fingers and/or paint brushes and/or sponges.
Tips
Although this is an easy-prep project it is a more time consuming clean-up project. Be sure to cover your art centre floors with a wipeable mat and have a bucket of warm soapy water handy so your little person can wash off when they are done before they get jello paint everywhere.
Also, you might not want to demonstrate the edible quality of this paint to your little person if you want to avoid your artist trying to eat all of your future paint recipes, some of which will likely be inedible.
The Review
I loved the quick-prep aspect of this project. The recipe produces vibrant, bright and shinny paint that smells good and has a fun, gooey texture that is immediately appealing to a little person. Aiden really enjoyed this one as he kept creating artwork for the better part of an hour. This is a keeper.
Happy jello painting,
Creatively yours,
Maya
An online recipe box of creative project ideas for curious, adventurous, playful toddlers.
Showing posts with label Creative recipe. Show all posts
Tuesday, January 3, 2012
Thursday, December 29, 2011
You Know You Are An Anderson When...
Every year at Christmas time we are fortunate to receive a Christmas-baking care package from Aiden's Great-Grandma. The care package usually consists of oodles of yummy goodness like shortbread cookies, Quality Street chocolates, banana bread, beet pickles and the best butter tarts known to man.
The other day, when we were digging into our goodies, I offered Aiden some of my butter tart. Not surprisingly he loved it. Upon his devouring of the butter tart I said to him, "Aiden, you know you are an Anderson when you love butter-tarts!" And this got me thinking about a project we could do together: The Book of Anderson.
Here's how I envision the project:
The Book of INSERT FAMILY NAME HERE
Supplies
Digital camera
Printer
Various art supplies
Stickers
Markers
Crayons
Construction paper
Binder
Clear plastic sheet protectors
Directions
1. With you little person, make a list of 15-20 things that are unique to your family. These could be things like family traditions, food that you all like, activities that you enjoy together or books that you read at bedtime.
2. Spend some time finding or taking or drawing pictures to illustrate each thing on your list.
3. Cut out the pictures and stick then to blank sheets of paper. Somewhere on the page write: You know you're a INSERT FAMILY NAME HERE when... And then somewhere on the page write down the item on your list.
4. Decorate each page with your little person using your art supplies.
5. When the pages are complete put them in the clear plastic sheet protectors and then in the binder.
6. Be sure to create a title page for your book.
Read the book with your little person as often as you like and add to the book whenever you discover something new that's unique about your family.
This would also be a fabulous project to do with a little one who is soon to be a big brother or sister. They will feel very important and special knowing that they are the ones who get to teach their younger sibling all about their family.
Happy book making,
Creatively yours,
Maya :)
The other day, when we were digging into our goodies, I offered Aiden some of my butter tart. Not surprisingly he loved it. Upon his devouring of the butter tart I said to him, "Aiden, you know you are an Anderson when you love butter-tarts!" And this got me thinking about a project we could do together: The Book of Anderson.
Here's how I envision the project:
The Book of INSERT FAMILY NAME HERE
Supplies
Digital camera
Printer
Various art supplies
Stickers
Markers
Crayons
Construction paper
Binder
Clear plastic sheet protectors
Directions
1. With you little person, make a list of 15-20 things that are unique to your family. These could be things like family traditions, food that you all like, activities that you enjoy together or books that you read at bedtime.
2. Spend some time finding or taking or drawing pictures to illustrate each thing on your list.
3. Cut out the pictures and stick then to blank sheets of paper. Somewhere on the page write: You know you're a INSERT FAMILY NAME HERE when... And then somewhere on the page write down the item on your list.
4. Decorate each page with your little person using your art supplies.
5. When the pages are complete put them in the clear plastic sheet protectors and then in the binder.
6. Be sure to create a title page for your book.
Read the book with your little person as often as you like and add to the book whenever you discover something new that's unique about your family.
This would also be a fabulous project to do with a little one who is soon to be a big brother or sister. They will feel very important and special knowing that they are the ones who get to teach their younger sibling all about their family.
Happy book making,
Creatively yours,
Maya :)
Wednesday, December 21, 2011
Choose Your Own Activity Advent Calendars
Alright, so I know it's way past the point of creating advent calendars but this brilliant idea, via Dawn McManus, floated into my inbox yesterday and I felt I had to share it with you.
Choose Your Own Activity Advent Calendar
Materials
Poster board
Construction paper
Glue
Sticky tack
Markers
Various art supplies
Directions
1. With your little person draw your chosen Christmas themed scene on your poster board. Decorate the scene using various art supplies.
2. Cut out 25 shapes that go with the scene (e.g. Tree decorations for a Christmas tree). Have your little person decorate one side of these. Number each shape from 1-25.
3. On the other side of the shape wrote down a special activity. Enlist your little person to come up with ideas. Examples: Decorate gingerbread men, go sledding, go to an indoor playground etc.
4. Stick the shapes to the scene using tack.
5. Each day have your little person take down the appropriate shape. Rear the activity and make time in the day to complete the activity.
Dawn said that this is the second year that her colleague has done this project. Her little guy loved it so much the first year that he asked if they would be doing it again this year.
I wish I had heard about this one before the season started but I will definitely do it next year. And if I can't wait that long I just might make a birthday advent calendar for Aiden in June.
Happy calendar making,
Creatively yours,
Maya :)
Choose Your Own Activity Advent Calendar
Materials
Poster board
Construction paper
Glue
Sticky tack
Markers
Various art supplies
Directions
1. With your little person draw your chosen Christmas themed scene on your poster board. Decorate the scene using various art supplies.
2. Cut out 25 shapes that go with the scene (e.g. Tree decorations for a Christmas tree). Have your little person decorate one side of these. Number each shape from 1-25.
3. On the other side of the shape wrote down a special activity. Enlist your little person to come up with ideas. Examples: Decorate gingerbread men, go sledding, go to an indoor playground etc.
4. Stick the shapes to the scene using tack.
5. Each day have your little person take down the appropriate shape. Rear the activity and make time in the day to complete the activity.
Dawn said that this is the second year that her colleague has done this project. Her little guy loved it so much the first year that he asked if they would be doing it again this year.
I wish I had heard about this one before the season started but I will definitely do it next year. And if I can't wait that long I just might make a birthday advent calendar for Aiden in June.
Happy calendar making,
Creatively yours,
Maya :)
Tuesday, December 20, 2011
Taking Time To Enjoy Your Little Person
In this frantic last week before Christmas, filled with episodes of "Yay, our Christmas shopping is done!"while removing boots, coats, toques and mitts of your thoroughly bundled little person, followed promptly with "Oh wait, did we get something for Cousin Bob?...no?...ugh...back to the stores we go", having only then to re-bundle your squirming, I've-had-enough-of-the-car/mall-for-a-lifetime, little person, it is crucial that we all take a moment to just be with our little people.
Sometimes we get so caught up in the I-want-to-host-dinner-this-year-but-we-always-do-it-at-my-place-exactly-that's-why-we-should-do-it-at-my-place-this-year-it's-only-fair family drama (or your version thereof) of this joyous season that we lose sight of the real heart and soul of Christmas. Religious or not, to me Christmas is about celebrating all the wonderful people in our lives and finding the perfect gift for each of them so that they will know how special they are to us. And what better gift to give your little person than your complete, undivided attention.
Here are a few things you can do with your little person, in between the Christmas rush, to give them that all-important, one-on-one attention:
One-on-One Activities
1. On the way back from one of your many shopping excursions, stop at the library and choose some books together. When you come home, make some hot chocolate, curl up together in your bean bag chairs and read a book together. Look for all the fun, tiny details in the pictures and get your little person to point out certain things when they hear them in the story.
2. Go to a Gymboree class or an indoor playground. Be with your little person and talk with them the whole time. Find something that they do that is impressive (not very hard as these little people are amazing!) and tell them how great they are getting at doing x, y or z.
3. When you unload the groceries enlist your little person's help. Get down to their level and give them small objects to put away. Talk to them about what they are putting away. Describe the textures, colours, shapes etc of the item. And be sure to thank your little person for their help.
4. Do an activity like pudding painting with your little person. (Put pre-made vanilla flavored pudding in several cups. Add food colouring to each cup. Lay out some wax paper in your art centre. Put your little person in their art smock and put dollops of the pudding paint on the paper. Let your artist dive in and paint with their hands). Get in there with them and explore the media together. Talk to your little person about the feel and the smell and the taste of the pudding. And don't worry about the mess - you can clean up later once you've both finished your creations.
5. At the mall, stop into a book store that had a kids section with your little person. Go to the train table or the princess castle or whatever they have laid out for the kids to play with and play with your little person. Get on their level and play with the toys too.
6. At the grocery store put your little one in the cart facing you. Chat with them about what you see in the store. Ask them questions about whatever it is that they like to talk about and really listen to their response. By the time you've finished your grocery shop you will have given your little person at least 30 minutes of undivided attention that will be cherished by both you and your little one.
7. Anything that involves being on the same level as your little on and being engaged in whatever activity they are doing. The little moments are really the most important ones.
Happy giving,
Creatively yours,
Maya :)
Sometimes we get so caught up in the I-want-to-host-dinner-this-year-but-we-always-do-it-at-my-place-exactly-that's-why-we-should-do-it-at-my-place-this-year-it's-only-fair family drama (or your version thereof) of this joyous season that we lose sight of the real heart and soul of Christmas. Religious or not, to me Christmas is about celebrating all the wonderful people in our lives and finding the perfect gift for each of them so that they will know how special they are to us. And what better gift to give your little person than your complete, undivided attention.
Here are a few things you can do with your little person, in between the Christmas rush, to give them that all-important, one-on-one attention:
One-on-One Activities
1. On the way back from one of your many shopping excursions, stop at the library and choose some books together. When you come home, make some hot chocolate, curl up together in your bean bag chairs and read a book together. Look for all the fun, tiny details in the pictures and get your little person to point out certain things when they hear them in the story.
2. Go to a Gymboree class or an indoor playground. Be with your little person and talk with them the whole time. Find something that they do that is impressive (not very hard as these little people are amazing!) and tell them how great they are getting at doing x, y or z.
3. When you unload the groceries enlist your little person's help. Get down to their level and give them small objects to put away. Talk to them about what they are putting away. Describe the textures, colours, shapes etc of the item. And be sure to thank your little person for their help.
4. Do an activity like pudding painting with your little person. (Put pre-made vanilla flavored pudding in several cups. Add food colouring to each cup. Lay out some wax paper in your art centre. Put your little person in their art smock and put dollops of the pudding paint on the paper. Let your artist dive in and paint with their hands). Get in there with them and explore the media together. Talk to your little person about the feel and the smell and the taste of the pudding. And don't worry about the mess - you can clean up later once you've both finished your creations.
5. At the mall, stop into a book store that had a kids section with your little person. Go to the train table or the princess castle or whatever they have laid out for the kids to play with and play with your little person. Get on their level and play with the toys too.
6. At the grocery store put your little one in the cart facing you. Chat with them about what you see in the store. Ask them questions about whatever it is that they like to talk about and really listen to their response. By the time you've finished your grocery shop you will have given your little person at least 30 minutes of undivided attention that will be cherished by both you and your little one.
7. Anything that involves being on the same level as your little on and being engaged in whatever activity they are doing. The little moments are really the most important ones.
Happy giving,
Creatively yours,
Maya :)
Friday, December 16, 2011
Mud Pie Fossil Madness
As I was looking through my photos from the summer I came across this one of our adventures in making mud pie fossils.
This was a very special project for me as I was sharing a first with Aiden - both of our first time making mud pies. (Yes, I managed to live for 33 years without making a single mud pie!). It was extremely messy and ended up turning more into mud soup than mud pies but it was oodles of fun. Here's the recipe:
Marvelous Mud Pie Fossils
Ingredients:
Soil (either from your yard or from your leftover potting soil)
Water
Pasta shapes
Digging tools (spoons, trowels, cups etc.)
Container for the soil (foil roasting pans work well)
Felt square
1. Pour soil into a container.
2. Pour water into the container and have your little person stir it up.
3. Let your little person add pasta shapes to the mud mixture.
4. When your little person has made a pie, transfer it to a felt square. Let the mud dry.
Voila, you have yourself a mud pie fossil!
Tips
This is a wonderful project for outdoors, but it can be done indoors. It was very windy on the day we did this project so I set up Aiden's paddling pool in the kitchen and let him sit in the pool while making his fossils. Clean up was easy as I just had to hose off the pool and clean off Aiden.
The Review
This one was buckets of fun! Aiden had a great time mixing the soil and scooping it out to make his pies. We will definitely be doing this one again.
Happy mud pie baking,
Creatively yours,
Maya:)
This was a very special project for me as I was sharing a first with Aiden - both of our first time making mud pies. (Yes, I managed to live for 33 years without making a single mud pie!). It was extremely messy and ended up turning more into mud soup than mud pies but it was oodles of fun. Here's the recipe:
Marvelous Mud Pie Fossils
Ingredients:
Soil (either from your yard or from your leftover potting soil)
Water
Pasta shapes
Digging tools (spoons, trowels, cups etc.)
Container for the soil (foil roasting pans work well)
Felt square
1. Pour soil into a container.
2. Pour water into the container and have your little person stir it up.
3. Let your little person add pasta shapes to the mud mixture.
4. When your little person has made a pie, transfer it to a felt square. Let the mud dry.
Voila, you have yourself a mud pie fossil!
Tips
This is a wonderful project for outdoors, but it can be done indoors. It was very windy on the day we did this project so I set up Aiden's paddling pool in the kitchen and let him sit in the pool while making his fossils. Clean up was easy as I just had to hose off the pool and clean off Aiden.
The Review
This one was buckets of fun! Aiden had a great time mixing the soil and scooping it out to make his pies. We will definitely be doing this one again.
Happy mud pie baking,
Creatively yours,
Maya:)
Wednesday, November 16, 2011
Bubble Painting
Aiden loves water and bubbles, so yesterday, despite the lack of mud room or tiled space in our house, I set up a makeshift water table for him on our coffee table/creativity centre.
Water Table
1. Fill a larger Tupperware container with warm water.
2. Add dish soap and food colouring to the water.
3. Place water container on a little person level table. Be sure to put towels on the floor around the table.
4. Provide various toys and items for your little one to play with and marvel at their creative use of these items.
Now I could have just given him the usual water table types of toys, like cups and ducks and floating toys, but I decided to throw in a spoon, some sponges that we just used for wrapping paper making and a paintbrush. Aiden dove right in, covering himself, the table and the floor with bubbles. And then, being the creative little soul that he is, Aiden proceeded to use the water and bubbles as paint and the table as a canvas and using the paintbrush and sponges, covered the table with magnificent bubble designs. How neat is that?!
Happy bubbling,
Creatively yours,
Maya :)
Water Table
1. Fill a larger Tupperware container with warm water.
2. Add dish soap and food colouring to the water.
3. Place water container on a little person level table. Be sure to put towels on the floor around the table.
4. Provide various toys and items for your little one to play with and marvel at their creative use of these items.
Now I could have just given him the usual water table types of toys, like cups and ducks and floating toys, but I decided to throw in a spoon, some sponges that we just used for wrapping paper making and a paintbrush. Aiden dove right in, covering himself, the table and the floor with bubbles. And then, being the creative little soul that he is, Aiden proceeded to use the water and bubbles as paint and the table as a canvas and using the paintbrush and sponges, covered the table with magnificent bubble designs. How neat is that?!
Happy bubbling,
Creatively yours,
Maya :)
Tuesday, November 15, 2011
Family Photo Flash Cards
Aiden is very fortunate to have fabulous relatives both near and far. We try to visit with his Grandma and Grandpa and his Grandpa Doc (when he's in town) at least once a week but sometimes life gets in the way and we don't get to see everyone as much as we'd like. Aiden also has a Granny who lives in Scotland (who is arriving tomorrow!), an Auntie in London and an Uncle, Auntie and Cousins in California that he rarely gets to see. So
Aiden is at the stage where he is a bit weary of people he doesn't know or doesn't see on a regular basis and with the holidays coming up and family coming into town we want to prepare Aiden for strange family faces as much as possible. Enter family photo flash cards.
Family Photo Flash Cards
1. Find or take digital pictures of important family members or other people you want your little person to remember. Be sure to include photos of Mom and Dad and your little person. You can even include photos of your little person's lovey, like Aiden's monkey.
2. Shrink them to index card size.
3. Print the photos out on paper or card stock.
4. Cut the photos out and laminate them.
5. Stack the photos and punch a hole through the top left corner. Secure the stack with a binder ring.
6. Go through the stack of pictures with your little person during the day naming each person or asking your little person who the photo is. You can also play a memory game with the cards: Lay the cards out on the floor face down. Ask your little person to find a relative. Then they will turn over the cards until they find the relative. Repeat until you have gone through all the cards.
The Review
Aiden loves his stack, so much so that he asks to see "Papa" or "Dada" periodically throughout the day. He also laughs like crazy when we get to the picture of his monkey bombing our photo. And in terms of recognizing family and being comfortable with them when he hasn't seen them for awhile, so far so good, but I guess the real test will be when he sees Granny tomorrow for the first time since May.
Happy flashing,
Creatively yours,
Maya:)
Aiden is at the stage where he is a bit weary of people he doesn't know or doesn't see on a regular basis and with the holidays coming up and family coming into town we want to prepare Aiden for strange family faces as much as possible. Enter family photo flash cards.
Family Photo Flash Cards
1. Find or take digital pictures of important family members or other people you want your little person to remember. Be sure to include photos of Mom and Dad and your little person. You can even include photos of your little person's lovey, like Aiden's monkey.
2. Shrink them to index card size.
3. Print the photos out on paper or card stock.
4. Cut the photos out and laminate them.
5. Stack the photos and punch a hole through the top left corner. Secure the stack with a binder ring.
6. Go through the stack of pictures with your little person during the day naming each person or asking your little person who the photo is. You can also play a memory game with the cards: Lay the cards out on the floor face down. Ask your little person to find a relative. Then they will turn over the cards until they find the relative. Repeat until you have gone through all the cards.
The Review
Aiden loves his stack, so much so that he asks to see "Papa" or "Dada" periodically throughout the day. He also laughs like crazy when we get to the picture of his monkey bombing our photo. And in terms of recognizing family and being comfortable with them when he hasn't seen them for awhile, so far so good, but I guess the real test will be when he sees Granny tomorrow for the first time since May.
Happy flashing,
Creatively yours,
Maya:)
Sunday, November 6, 2011
Fun with Finger Painting
As a former art teacher and avid painter I was definitely looking forward to the day I could share my love of painting with Aiden. Although I wanted to paint with him from day one, I knew I had to be patient and wait until he could understand what we were doing and more importantly that he shouldn't eat the paint so that he could fully appreciate the activity and explore the medium without having to be reminded every 5 seconds to not eat the paint. Well, that day came a few weeks ago when we tried finger painting for the very first time.
I have to say that I was a bit apprehensive before we started because I was nervous that he wouldn't enjoy it. But I told myself that if he didn't like finger painting it would be ok, maybe he's not ready for it yet and at least he's being exposed to something new which is most important.
So one afternoon, after nap time, I set up our creativity centre with some long sheets of newsprint paper, some cups for print making and some paper towels to clean up any spills. I put Aiden into his art shirt and spooned out some paint on the paper. I watched him examine the gloppy mixture that was sitting on top of the paper and then he dove in with both of his hands, swirling the paint around his canvas. He squelched the paint through his fingers, squealing with joy as he wiped the paint that was in his hands all over his clean art shirt. When he ran out of paint on the paper he said "More, more, more". And then he got back to it, discovering what happens when he mixes the colours together and how he can make different impressions on the paper depending on what part of his hand/body he uses.
When he was done I took his artworks and put them in the kitchen to dry.
To preserve Aiden's first painting experience he and I chose part of his mural to frame. We hung it up in the hallway and unveiled his art in his very first art show with his Dad as the guest of honor. And now, everyday, when we walk through the hallway we can admire his creative genius, which I hope will give him the confidence to use his creativity to the max in a world that sometimes doesn't appreciate a creative soul.
Here's the finger paint recipe I used:
Washable Finger Paint
1/2 cup liquid dish soap
1/2 cup flour
1/2 cup water
Several drops of food colouring
1. Mix dish soap, flour and water in a bowl until a thick, creamy paint-like paste forms.
2. Separate mixture into 3 or 4 smaller containers. I used small IKEA plastic cups.
3. Add a different colour of food colouring to each container.
4. Cover and refrigerate until needed.
The Review
Like many things that I worry about as a Mom, I didn't need to worry as much as I did that Aiden would not enjoy this activity. He loved finger painting, yelling "More, more, more" everytime the paint ran out.
The Tips
This is obviously a messy project so be prepared for this and allow your little person to paint with wild abandon as there is nothing that a little paper towel and water won't clean up. I also plonked Aiden in the bath after the activity to clean him off as inevitably the finger paint turned into body paint.
Happy painting,
Creatively yours,
Maya :)
I have to say that I was a bit apprehensive before we started because I was nervous that he wouldn't enjoy it. But I told myself that if he didn't like finger painting it would be ok, maybe he's not ready for it yet and at least he's being exposed to something new which is most important.
So one afternoon, after nap time, I set up our creativity centre with some long sheets of newsprint paper, some cups for print making and some paper towels to clean up any spills. I put Aiden into his art shirt and spooned out some paint on the paper. I watched him examine the gloppy mixture that was sitting on top of the paper and then he dove in with both of his hands, swirling the paint around his canvas. He squelched the paint through his fingers, squealing with joy as he wiped the paint that was in his hands all over his clean art shirt. When he ran out of paint on the paper he said "More, more, more". And then he got back to it, discovering what happens when he mixes the colours together and how he can make different impressions on the paper depending on what part of his hand/body he uses.
When he was done I took his artworks and put them in the kitchen to dry.
To preserve Aiden's first painting experience he and I chose part of his mural to frame. We hung it up in the hallway and unveiled his art in his very first art show with his Dad as the guest of honor. And now, everyday, when we walk through the hallway we can admire his creative genius, which I hope will give him the confidence to use his creativity to the max in a world that sometimes doesn't appreciate a creative soul.
Here's the finger paint recipe I used:Washable Finger Paint
1/2 cup liquid dish soap
1/2 cup flour
1/2 cup water
Several drops of food colouring
1. Mix dish soap, flour and water in a bowl until a thick, creamy paint-like paste forms.
2. Separate mixture into 3 or 4 smaller containers. I used small IKEA plastic cups.
3. Add a different colour of food colouring to each container.
4. Cover and refrigerate until needed.
The Review
Like many things that I worry about as a Mom, I didn't need to worry as much as I did that Aiden would not enjoy this activity. He loved finger painting, yelling "More, more, more" everytime the paint ran out.
The Tips
This is obviously a messy project so be prepared for this and allow your little person to paint with wild abandon as there is nothing that a little paper towel and water won't clean up. I also plonked Aiden in the bath after the activity to clean him off as inevitably the finger paint turned into body paint.
Happy painting,
Creatively yours,
Maya :)
Wednesday, November 2, 2011
Coloured Rice Sand
Aiden loves his sandbox. Everytime we are in the yard he walks up to his sandbox, a red crab given to us by a friend from work, says "Eyes" while pointing to the crab's big googly eyes and then say "Appy", which is Aiden's version of the word open. After I take off the lid Aiden excitedly dives into the sandbox and proceeds to sift, pour, and mould the sand. He likes to bury toys and then retrieve them using woodchips as tools. He also uses his cups and pretends to drink the sand (ok, on his first few times in the sandbox he did actually put some sand in his mouth but spat it out pretty quickly and lived to tell the tale).
But now that the weather is getting colder we can't play outside in the sandbox as much as we used to, which is a shame as he does love it so. I suppose if we had a mud room or an area in our house that isn't carpeted we could always bring the sandbox inside, but unfortunately this isn't the case. So what to do instead?
Coloured Rice Sand
The Recipe
Rice
Vinegar
Food Colouring
Several bowls
A cookie sheet
1. Put rice in several bowls, as many as you want different colours of sand.
2. Pour a small amount, maybe a tsp, of vinegar on the rice and stir it up to coat the rice.
3. Pour food colouring in each bowl and stir to coat the rice. Depending on your little person's age and development you can get them to help you with this.
4. Pour the rice out onto a cookie sheet to dry. Leave overnight.
5. Pour the coloured rice into a shallow container.
6. Provide your little person with spoons, cups, toys (cars are great as they can drive through the sand) and containers and watch them explore the texture, sound and feel of their indoor sand.
The Review
I have to say I was a but skeptical of how engaging this activity would be, but I am now a believer - Aiden loved this activity, so much so that he spent a good half-hour to fourty-five minutes playing with the sand. He loved scooping it into cups, pouring it back into the container, and digging in it with his hands.
The Tips
Make sure you have a dustpan and brush handy. Along with pouring it into the container, Aiden enjoyed pouring it on the floor. The sound of rice falling on hardwood is way too enticing and fun for a little guy to resist! To keep the floor from getting too slippery I swept up the rice and put it back into the container whenever Aiden wasn't looking.
Happy rice dying,
Creatively yours,
Maya:)
But now that the weather is getting colder we can't play outside in the sandbox as much as we used to, which is a shame as he does love it so. I suppose if we had a mud room or an area in our house that isn't carpeted we could always bring the sandbox inside, but unfortunately this isn't the case. So what to do instead?
Coloured Rice Sand
The Recipe
Rice
Vinegar
Food Colouring
Several bowls
A cookie sheet
1. Put rice in several bowls, as many as you want different colours of sand.
2. Pour a small amount, maybe a tsp, of vinegar on the rice and stir it up to coat the rice.
3. Pour food colouring in each bowl and stir to coat the rice. Depending on your little person's age and development you can get them to help you with this.
4. Pour the rice out onto a cookie sheet to dry. Leave overnight.
5. Pour the coloured rice into a shallow container.
6. Provide your little person with spoons, cups, toys (cars are great as they can drive through the sand) and containers and watch them explore the texture, sound and feel of their indoor sand.
The Review
I have to say I was a but skeptical of how engaging this activity would be, but I am now a believer - Aiden loved this activity, so much so that he spent a good half-hour to fourty-five minutes playing with the sand. He loved scooping it into cups, pouring it back into the container, and digging in it with his hands.
The Tips
Make sure you have a dustpan and brush handy. Along with pouring it into the container, Aiden enjoyed pouring it on the floor. The sound of rice falling on hardwood is way too enticing and fun for a little guy to resist! To keep the floor from getting too slippery I swept up the rice and put it back into the container whenever Aiden wasn't looking.
Happy rice dying,
Creatively yours,
Maya:)
Subscribe to:
Posts (Atom)